
How We Produce African Violet Seeds: A Complete Overview
How We Produce African Violet Seeds: A Complete Overview
The purpose of this article is twofold. First, we want to explain the challenges involved in producing African violet (Av) seeds on a large scale. Second, we will describe the methods we developed to overcome those challenges. If seed production were easy, we would not be the only people in the world who make and sell Av seeds, both to the public and to major seed companies.
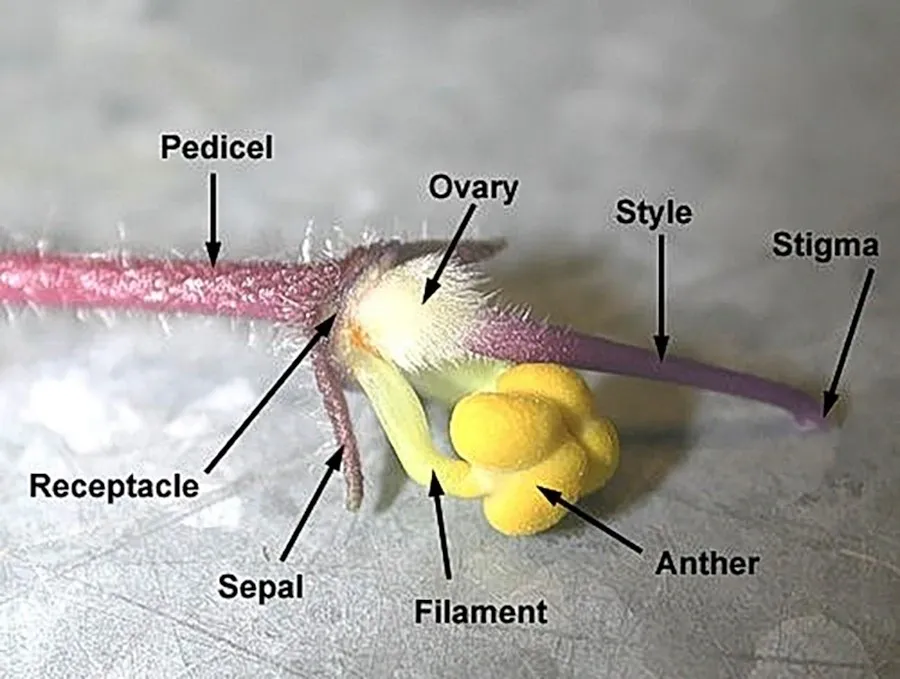
For reference, this Photo no 1 shows the reproductive parts of an Av flower with its petals removed.
Hybridizing African Violets
To hybridize Avs, pollen is taken from the anther of one variety and transferred to the stigma of another. The complication is that Av pollen is hidden inside the yellow anthers, and the pollen cannot be accessed unless the anther’s yellow coat is broken.
In nature, insects such as thrips scratch through the anther coat to reach the pollen. For human hybridizers, the coat must be cut open to expose the pollen before it can be applied to stigmas. This is a tedious and time-consuming task. For large-scale, commercial production, efficient pollination procedures are essential.
Another issue is that hybridizers generally need only small amounts of seed, while professional seed producers like us require hundreds of times more. Unfortunately, most modern Av varieties produce either poor-quality pollen that cannot fertilize, or flowers that fail to produce pods even when pollinated with known fertile pollen. In addition, commercial viability requires pods that contain 300–500 or more seeds each.
Requirements for Successful Large-Scale Seed Production
To produce large quantities of high-quality Av seeds, three things are absolutely necessary:
- Efficient pollination techniques.
- Good-egg Av varieties – plants that consistently produce large pods with hundreds of seeds when pollinated.
- Good-pollen Av varieties – plants that reliably fertilize good-egg varieties.
This can be summarized in a formula:
Time-efficient pollination + [Good-pollen Av variety × Good-egg Av variety] = Large pods full of seeds.
Seed Quality and Customer Satisfaction
Because we value customer satisfaction, our selected seed-producer varieties are bred to contain DNA that results in attractive, vigorous new plants. Since beginning commercial sales in 1977, we have continued to develop new and more floriferous seed-producer varieties.
Today, we ship retail seed orders to customers in at least 130 countries. Many buyers discover us when searching for Av seeds online, often because they cannot find them locally. We even have repeat customers in Reunion, a small island nation in the Indian Ocean.
On the wholesale side, we sell gram quantities of Av seeds to Park Seed (USA) and Western Seeds (Canada). (A gram of Av seed contains a very large number of seeds, though each seed is extremely small and lightweight.)
Tools and Pollination Method

This Photo no 2 shows the tools we use for pollination: tweezers, a razor blade, and a small holding ring.
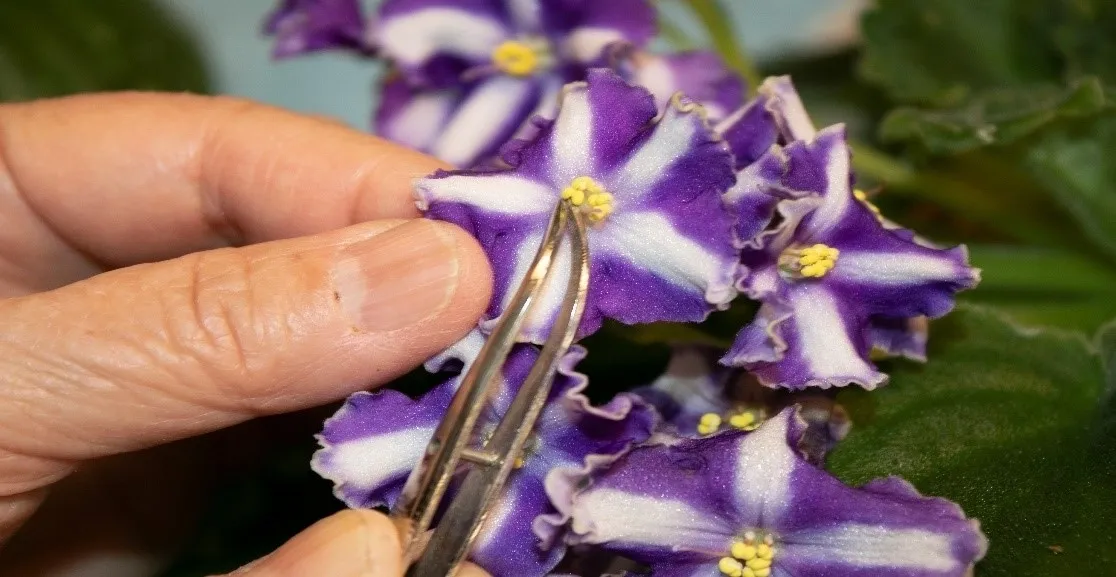
In Photo 3, Katsuko is shown removing anthers from the variety Victorian Parasol (hybridized by S. Sorano).
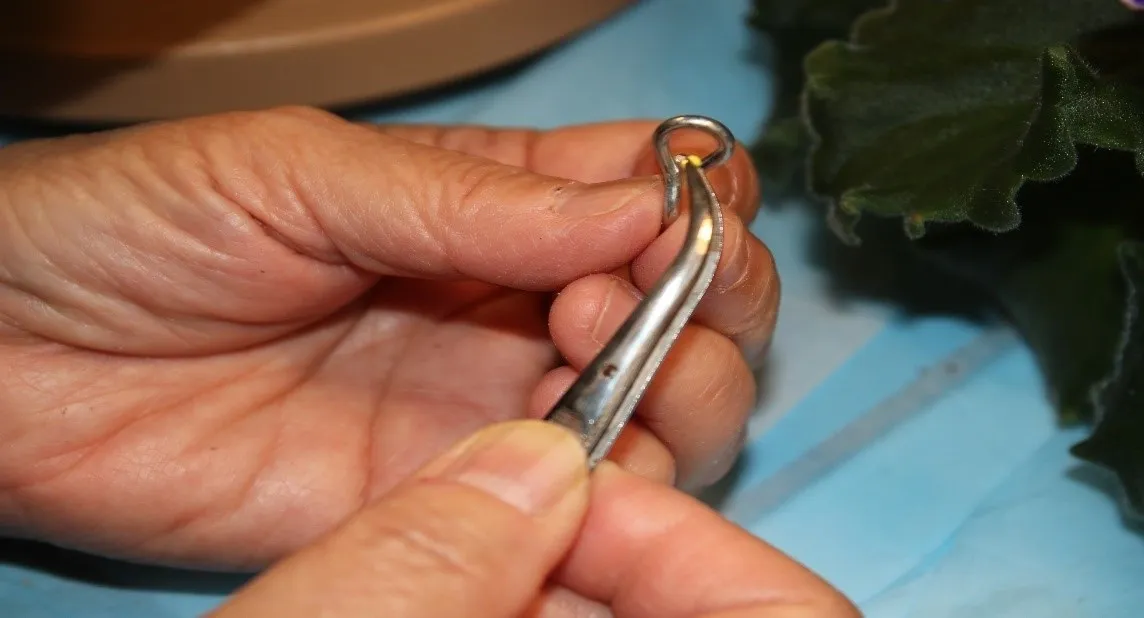
In Photo 4 shows how a chain link is used to clamp the tweezers, allowing her hands to relax while holding the anthers.
The pollen must be powdery to be effective. If it is not, she will try anthers from fresher—or sometimes older—flowers until good pollen is found.
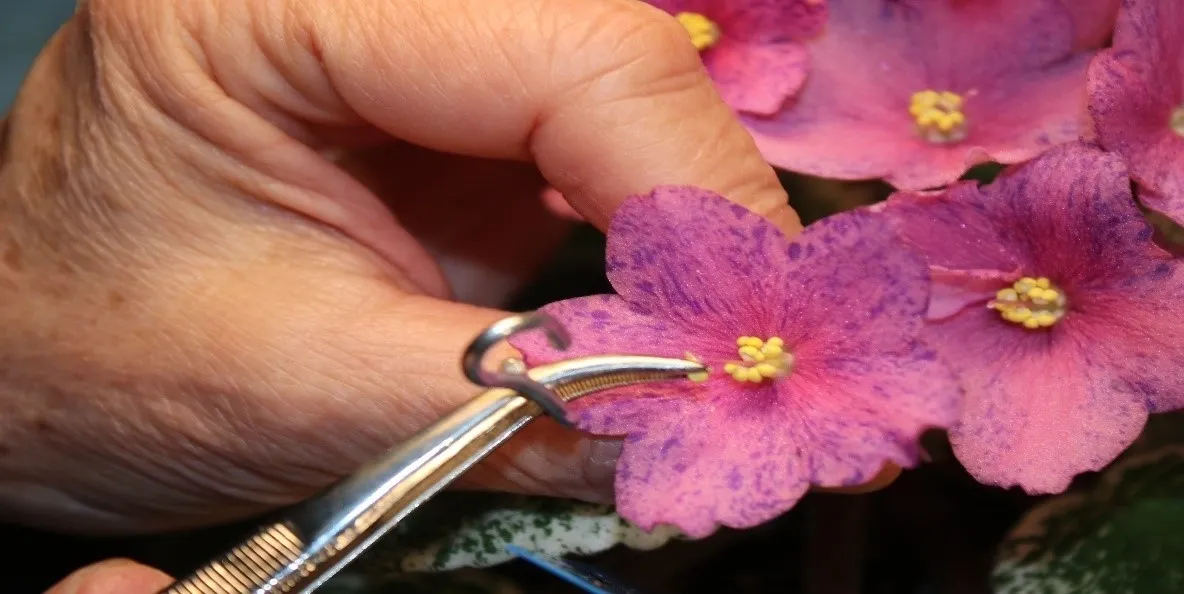
In Photo 6 below, powdery pollen is being applied to the stigma of a pink fantasy flower. The stigma is touched directly into the cut anther, ensuring it receives plenty of pollen. This step is critical: each pollen grain fertilizes a single egg, which develops into one seed. To produce seed-filled pods, large amounts of pollen must be deposited.
Labeling and Tracking
We currently sell seeds from four Av types: Variegated, Standard, Little Gems, and Fantasy. Accurate labeling is essential to track parentage.
In Photo 7, labeled flower stems are shown after pollination.
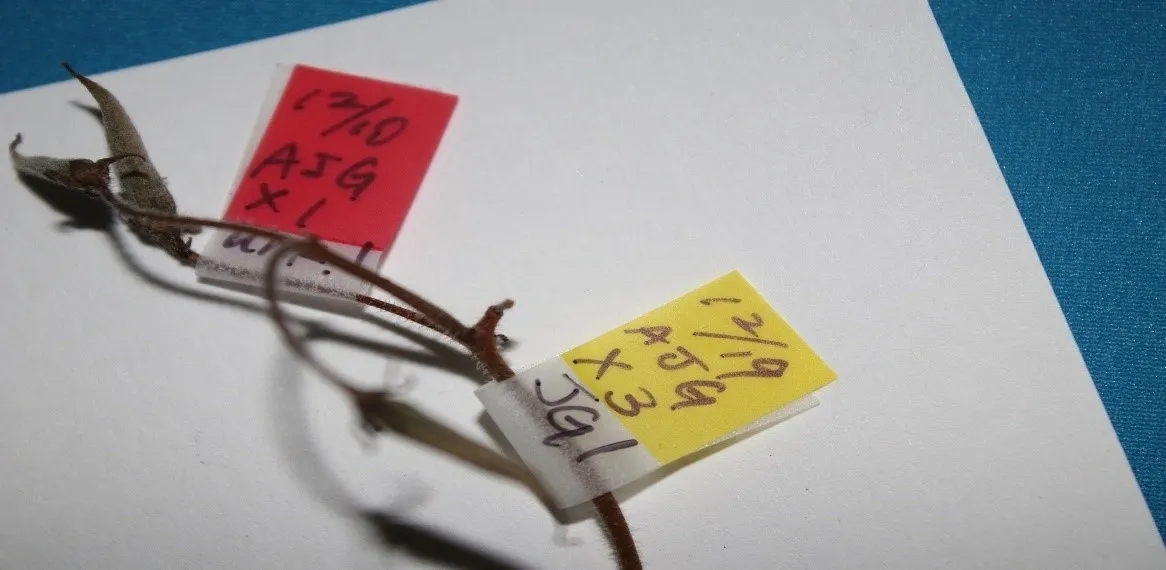
The red flag indicates that on December 10, a flower from plant AJGwas pollinated with pollen from plant UNK. The yellow label shows that on December 19, the three remaining unpollinated flowers on that same peduncle were pollinated with pollen from plant JG1.
Pod Development and Harvesting
When conditions are right—meaning the parent plants are genetically compatible, the pollen is powdery, and the stigma is receptive—a fertilized pod will show signs of pregnancy within 8 days.
Photo 8 illustrates pod sizes at various stages, from day 0 (pollination) through more than 3 months post-pollination (mature, dry pods).

Most pods mature by 3½ months, although some require up to 5 months.
A fully mature pod, as seen in Photo 9, can release around 600 seeds. Under magnification, most seeds appear plump and full-sized, though some are small and fluffy. Because poor seeds do not germinate, they must be separated from healthy ones.
This refining process is called winnowing—“separating the wheat from the chaff.”
- In Photo 10, seeds are winnowed by placing them on a sheet of computer paper, tilting the paper, and gently shaking it.
- Good seeds, being plump and football-shaped, roll smoothly to the bottom (Photo 11).
- Poor seeds, being lighter and misshapen, do not roll effectively.
Sowing and Germination
Sowing Av seeds is straightforward, provided the germination mix contains starter fertilizer. Without it, seeds will germinate but fail to grow, sometimes so slightly that the germination is unnoticed. If unsure, pre-moisten the mix with fertilized water before sowing.
- Fill a container with the moistened mix (Photo 12).
- Flatten the surface gently with a spool.
- Place seeds on an index card and tap them lightly to distribute them evenly onto the surface.
- Cover the container or place it inside a plastic bag. Provide good light, the same as for mature Av plants.
After a day or two, condensation should appear inside the plastic cover. If condensation is lacking, the mix may be too dry—remove the cover, spray with water or fertilizer solution, and replace.
At 75°F, germination typically begins around 14 days after sowing (earlier if temperatures are higher). Photo 13 shows seedlings at 21 days post-sowing.
Transplanting Seedlings
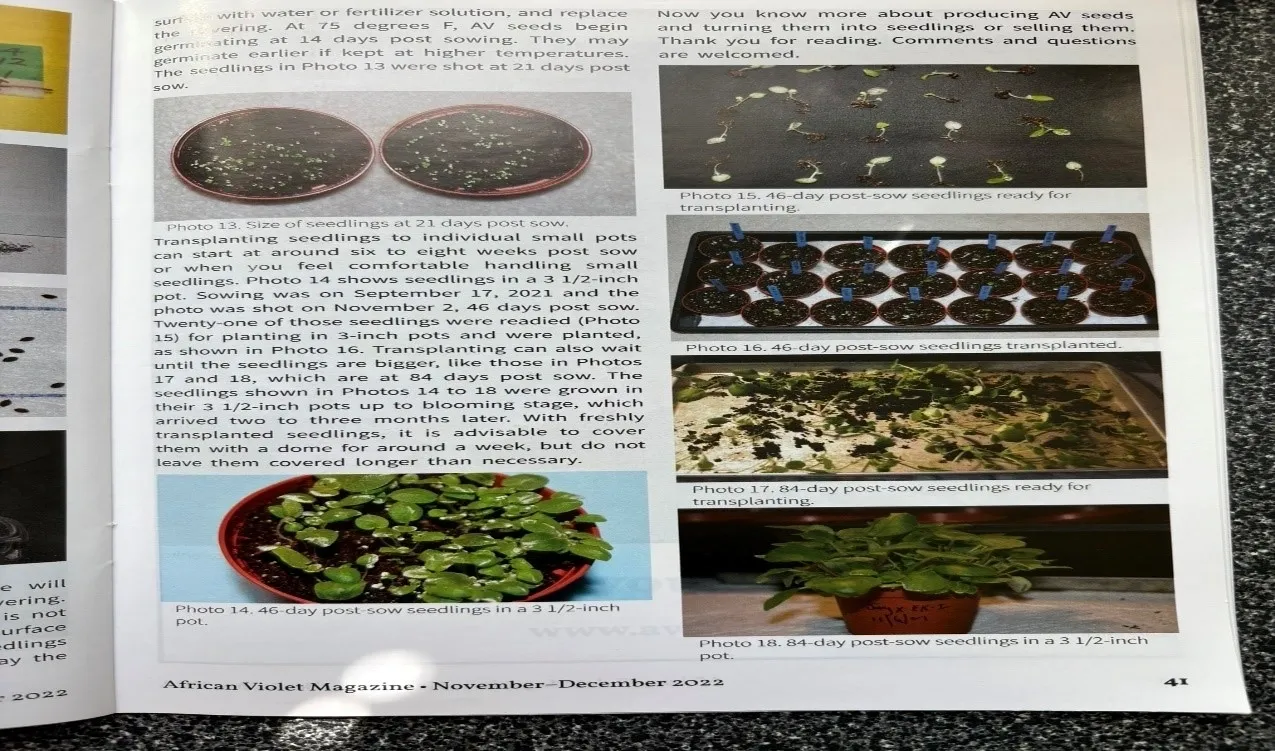
Seedlings can be transplanted into individual pots starting around 6–8 weeks post-sowing, or whenever you are comfortable handling them.
- Photo 14 shows seedlings at 46 days post-sowing in a 3.5-inch pot (sown on September 17, 2021, photographed November 2, 2021).
- In Photo 15, 21 of those seedlings are prepared for transplanting into individual 3-inch pots.
- Photo 16 shows the seedlings after being transplanted.
Transplanting may also be delayed until seedlings are larger:
- Photo 17 shows seedlings in a 3.5-inch pot at 84 days post-sowing.
- Photo 18 shows those same seedlings prepared for transplanting at 84 days.
After transplanting, seedlings can be grown in their 3.5-inch pots until blooming, which generally occurs 2–3 months later. When freshly transplanted, seedlings should be covered with a dome for about a week, but not longer than necessary.
Concluding notes
Producing, sowing, and selling African Violet seeds is a labor-intensive but rewarding process. By combining careful hybridization, precise pollination, and thorough seed selection, we ensure that our customers receive high-quality seeds capable of growing into beautiful, floriferous plants.
I am proud to continue this work with my wife, Katsuko, sharing rare African Violet seeds with enthusiasts around the world. If you are interested in growing these extraordinary plants, visit our website Nadeau African Violet Seeds or email us at Avseeds@yahoo.com for more information. Your next garden masterpiece might start with just a tiny seed from our collection.
Photo Captions
- Reproductive parts of Av flowers, with petals removed.
- Pollination tools:tweezers, razor blade, and holding ring.
- Removing anthers fromVictorian Parasol.
- Applying the chain link clamp.
- Slicing off part of the anther coat.
- Touching the stigma into the anther.
- Pods labeled with date and parent names.
- Pod sizes from day 0 to 3+ months after pollination.
- Over 600 seeds from one pod.
- Refining raw seeds by winnowing.
- Good seeds roll like footballs.
- Examples of sowing containers.
- Seedlings at 21 days post-sowing.
- Seedlings in a 3.5-inch pot at 46 days post-sowing.
- 46-day seedlings prepared for transplanting.
- 46-day seedlings after transplanting.
- Seedlings in a 3.5-inch pot at 84 days post-sowing.
- 84-day seedlings ready for transplanting.